Highlights / isolates overlapping Parts. When making Parts from one or more linked model authored by others, some poor modeling should be assumed. This functionality will help you quickly find conditions like:
•Floors and Walls incorrectly overlapping
•Walls incorrectly overlapping each other
•Floors incorrectly overlapping each other

1.Parts must already exist to use this feature.
2.From the Revit ribbon menu, click PCL tab > PartsLab panel > Find Overlaps.
3.Open the overlap validation view. PartsLab prompts you to open this view when opening this tab after.
The tools on this tab will not work in any other Revit view. Only the PartsLab Overlapping Parts view responds to these features.
4.In the Review Overlapping Parts tab, use the options to filter by object & level to find specific overlap conditions.
•See interactive image below for overlap filtering and display options.
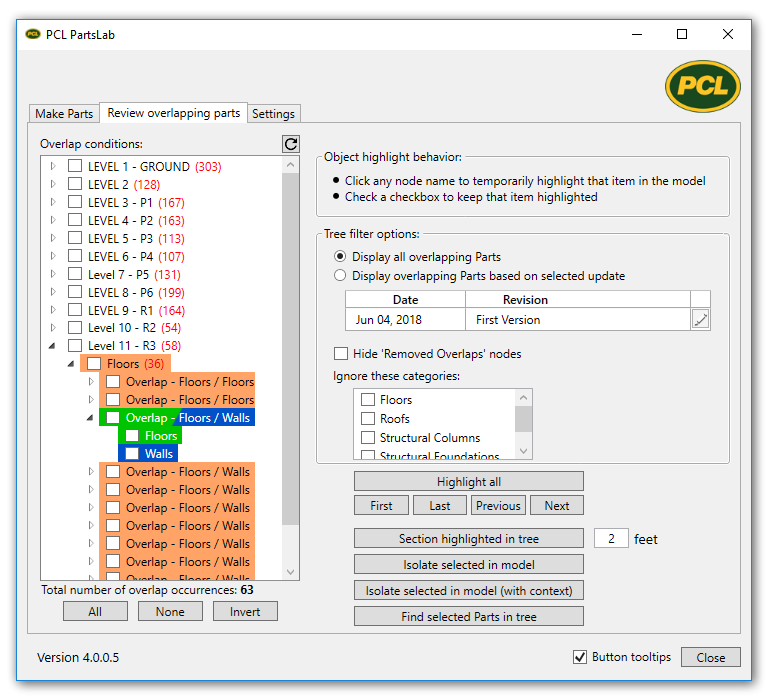
•An overlap that involves objects from different categories will be displayed as an overlap within both of those category nodes in the tree.
oA Floor / Wall overlap will appear in both the Floor and Wall category nodes.
•You can also filter by specific design update if you want to see overlaps related to a specific update
All overlap occurrences will be displayed with an orange override in the managed view.
You must be in the managed view when using any features on this PartsLab tab.
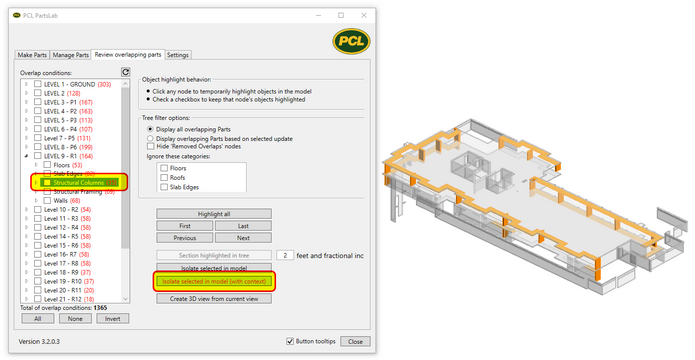
Want to see all overlapping Parts on a specific level or category on that level? 1.In the Overlap Conditions tree, click the building level node NAME to temporarily highlight all the overlaps on that level. 2.Click another building level node NAME to temporarily highlight those overlaps. 3.Click a building level checkbox to keep that level highlighted, now click other level NAMES. 4.To highlight all overlaps of a specific category within a level, expand the building level node and click the name of the category in the tree.
Click to enlarge image
In this image, all overlaps on Level 9 involving Structural Columns are being highlighted.
|
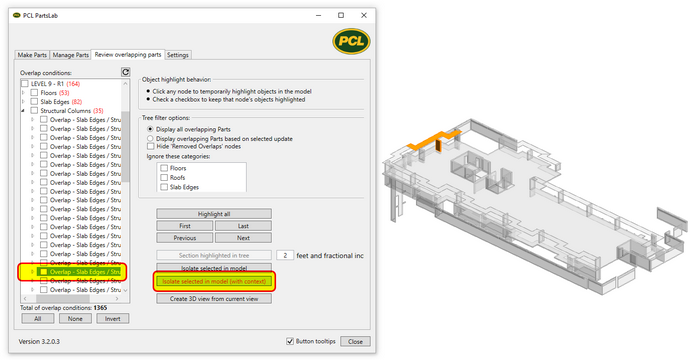
Want to see a specific overlap condition of two specific Parts? 1.Open a building level node in the Overlap Conditions tree. 2.Click the NAME of an overlap occurrence to temporarily highlight that overlap. 3.Click another overlap NAME to temporarily highlight that overlap. Use keyboard arrows to quickly move though individual overlaps. You can highlight individual objects within an overlap by clicking the object name inside the overlap node 4.Click the checkbox next to an overlap NAME to keep it highlighted while clicking other overlap NAMES.
Click to enlarge image
In this image, only the selected overlap being highlighted.
|
This feature was intended to declutter the tree – you can remove overlaps that are not a real issue. When an overlap gets ‘removed’, it is being moved from the current tree category node into a new node within that same level. That new node is named ‘Removed Overlaps’. These removed conditions still exist in the model, they are just not stored in the same place. Removed overlaps are persistent, and will remain in this node during future Revit sessions. They can also be restored back to the original node. The only way an overlap condition will completely disappear, is when those parts no longer overlap. Either the Part or it's original object must be edited to remove the overlap.
Remove Overlapping Conditions: 1.Select one overlap by highlighting the overlap name. Right-click on that node name and click Remove this condition. To process more than one at a time, check a few checkboxes then right-click and click Remove checked conditions on this level. BE SURE no other items are checked or they will be removed too! 2.These removed overlaps will still appear orange with all other overlap conditions on that level unless you turn ON the option 'Hide Removed Overlaps' nodes.
Restoring Overlaps that have been Removed: All overlaps that havve been removed are now located in a node named Removed Overlaps. Each building level has its own Removed Overlaps node if an overlap has been removed on that level. To restore: 1.Go to the Removed Overlaps node on that level. 2.Select a node name, or check the box of all nodes to be restored. 3.Right-click over one of the selected nodes and click Restore this Removed Overlap condition, or Restore all checked Removed Overlap conditions on this level.
|
Why do I see overlaps on other levels when highlighting just one level in the tree? This is not a bug, and can happen when one or more of the following conditions occur:
•A part on the level you have highlighted or checked in the Overlap Conditions tree overlaps a part on another level.
•One or more Parts on the level you have highlighted or checked in the Overlap Conditions tree extends beyond its assigned level, overlapping objects on other levels. An example of this would be a wall or column that occupies several levels. This overlap condition can be overcome by dividing those parts.
The only way an overlap condition will completely disappear, is when those parts no longer overlap. Either the Part or it's original object must be edited to remove the overlap.

Updated May 11, 2023. Version 4.3.0.12
Published by: D. Denton


